
How I went about trying to grow citrus in my bathtub, something which is both normal to want and possible to achieve
See the code on GitHub: WtrCntrl
I live in Seattle, which in meteorological terms is in the Köppen Csb area, or “Warm-Summer Mediterranean Climate” zone, the same as Los Angeles or French Provence. It’s also zone 9a in the USDA Plant Hardiness system, which is solidly in the warmer half of the scale, and should allow me to grow pretty much anything that’s not tropical directly in the soil.
Here’s the problem though: in reality, this place is essentially Waterworld nine months out of twelve, if you’re lucky. It never stops raining, the sun is just a distant memory, and we even get snow every now and then (not enough to brighten things up, but definitely enough to murder your garden). So growing an orange tree here? Outside? I don’t think so.
Therefore, the only logical solution (as “not doing this” is of course not an option) is to grow it indoors, in my bathtub. But how?
This is the story of how I ended up with this setup:
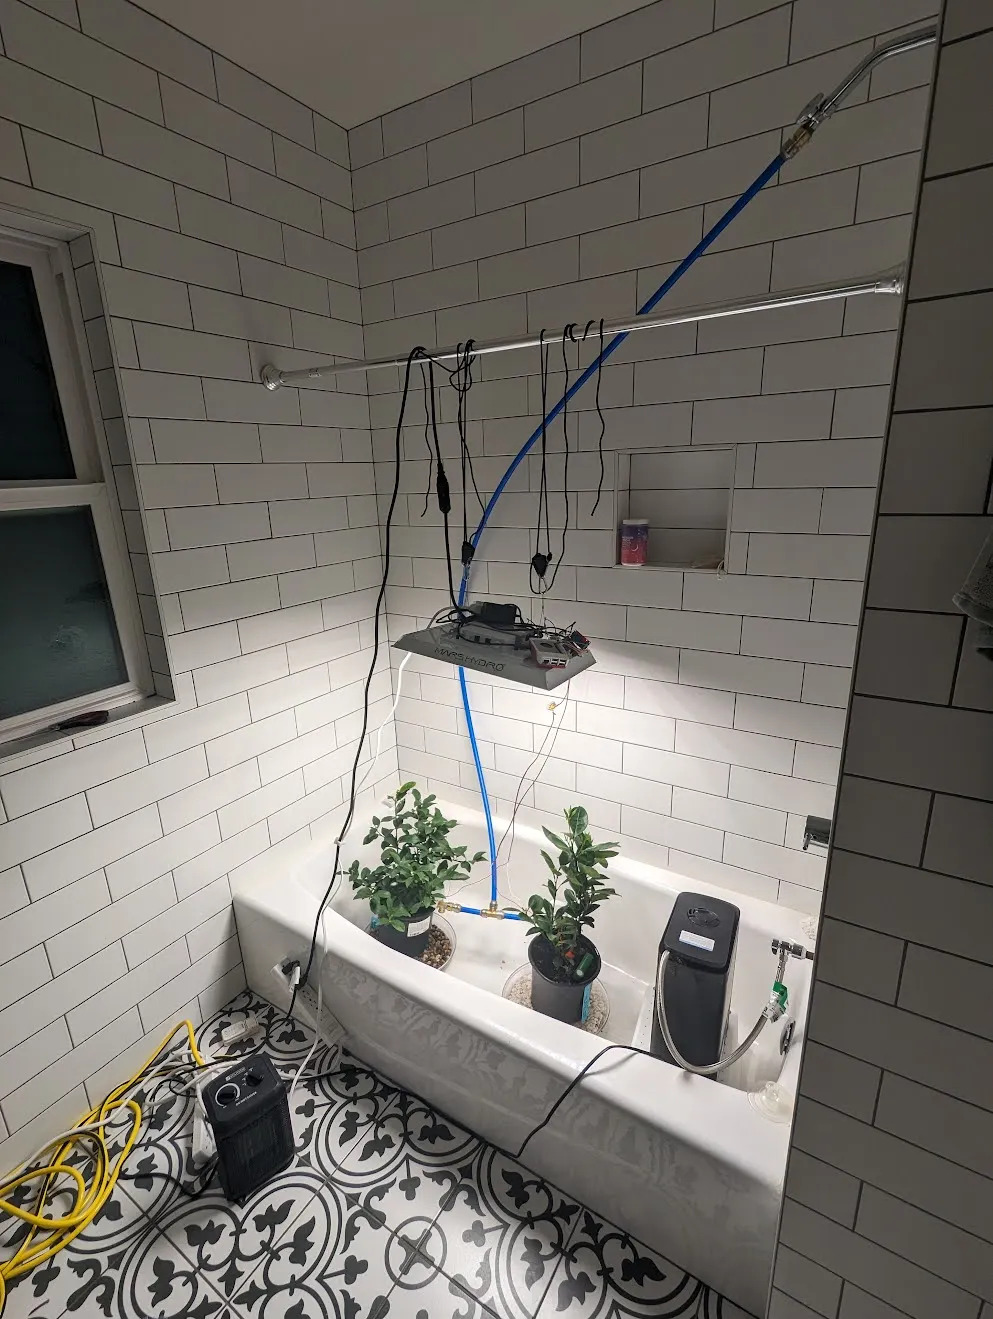
The madness begins
So I wanted to grow some citrus indoors, right, but I also wanted it to be Smart and Automated, because systems are fun, and it gives me something to talk about on dates.
I got a navel orange tree from local nursery Swanson’s, and then I reviewed what I had on hand. I had a growing light bulb that I got “just in case” at a plant store sale and which I had never used. So my initial plan was to get a light fixture, mod it slightly so that it can plug into the wall, and suspend it from the ceiling of my utility room. I added a small space heater for warmth (my utility room is usually around 65F/18C, which is too cold for an orange tree), a basic humidifier, and here we go:
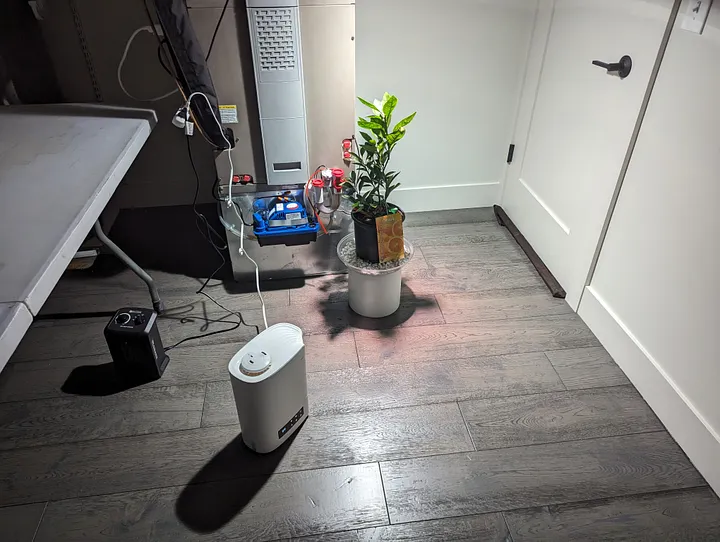
But there were a couple of issues with this setup:
- This room is somewhat big, so warming up this entire space just for one (1) plant is not super reasonable
- Pumping your basement full of humidity is probably a Bad Idea
- I still needed to water the plant like a peasant. I also needed to refill the humidifier tank every other day, again, much like a peasant
- It’s only one plant, and you know what would be twice as cool? Two plants
So I got a second tree (a meyer lemon tree, this time), and migrated the whole thing upstairs to my guest bathroom, which is one out of only two rooms in this house to have a South-facing window (a baffling decision from the builders in this climate, but what can I do). It’s also smaller, and is, you know, a bathroom, so humidity should be less of a problem.
I was also underwhelmed by my old grow light, so I ordered a 150W Mars Hydro grow light, and the light output went from “old candle” to “a camera flash that never ends”:
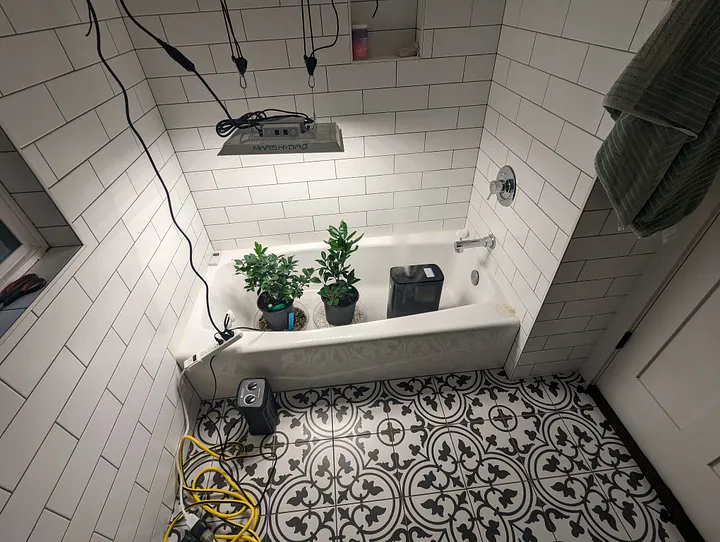
That lamp and the heater are behind a Philips Hue smart plug that’s set up to run from 07:00 to 21:00 (plants need darkness to rest, and a temperature differential to flower). Hue is typically a smart light brand, and I do indeed have a dozen or so Hue lamps around the house; I had this plug to control some string lights which I’m no longer using. It works and it’s easy to control, so I’m using that for now.
Moving to the bathroom also opened up the exciting possibility of automated irrigation.
I dipped my toe in the water (jokes) by building a thing to automatically fill up the humidifier tank:
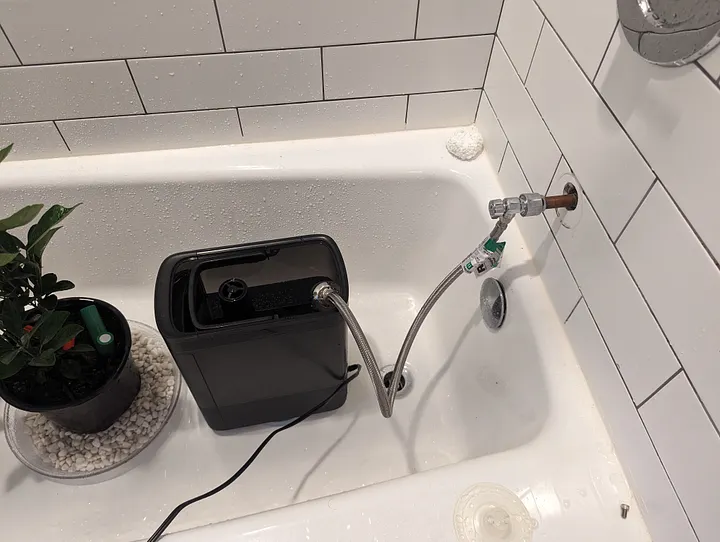
I removed the faucet from the bathtub (no big loss: this bathtub is super small and I can only shallow-fry myself in it. I need to be deep fried or what’s the point?), installed a length of faucet piping, and then plugged in an automatic water level control valve at the end.
This gizmo is pretty simple: when it’s outside of the water, it’s open, and water flows. When it’s submerged, a floating ball closes the valve. Plop it in the humidifier tank, and voilà, unlimited humidifying.
So that’s neat and everything, but that won’t work for watering the plants. For this, we need something much, much more complicated.
The plan
My basic idea was to install some tubing, and have electronically controlled valves at the end. Then, I would write some code to poll the humidity sensors in the soil (the green stick things you can see on the pictures) and open the valves for a few seconds as needed.
Hardware and wiring
I ordered one of the new Raspberry Pi 5 (completely overkill for this project of course, but I’ve been meaning to get one anyway). Presumably I could have achieved the same result with an Arduino or something, but I like the comfort of having a full Linux system and being able to use Python for the code, and, also, I do what I want.
To control the water, I got these 12V solenoid valves. The valve is closed by default: feed it 315 mA of power at 12V, and bim bam boom, it opens up.
Problem: the Raspberry Pi only outputs 5V, which is less than 12. As I write that, I could have used a step up transformer or something, but that sounds complicated, so instead I cannibalized an old 12V power supply I had lying around (no idea what it was supposed to power, I have a whole box of these. This is what happens when device manufacturers don’t use USB to power stuff!).
Then I needed to be able to control when the power is on and off. For this you need a relay. You can get a whole bag of 10 for 15 bucks. Since I’m a dum-dum, I originally ordered a “12V relay”, thinking that this was a relay to control 12V of power. Not so: the voltage here refers to what you need to feed the relay itself to power it. All of these models can actually control up to 15 amps of 125V power or 10 amps at 250V, which is a wild amount of power for such a tiny thing (this is the power input of, like, a heater, or a microwave).
I’m going to steal this circuit diagram from the Amazon listing:
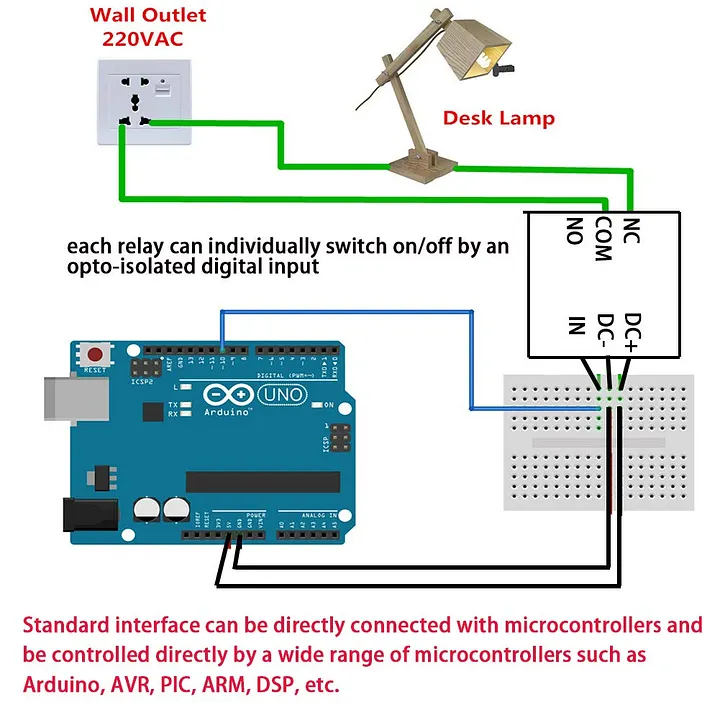
You power the relay from the Pi (or Arduino on that pic), then you have a control wire on the “In” input, and then on the other side, you make a circuit between the power supply (which in my case is the 12V charger), the load (the valve), and the relay. When you feed the “in” pin with a tiny bit of power, the relay closes the circuit, and the current (both electrical, and, in our case, aquatic) flows.
I wired all of that stuff together. Initially I used some 24 AWG jumper cables, but they’re kinda annoying to crimp to terminals, so I eventually got a length of 18 AWG cable from Home Depot, which I think is meant to be used for doorbells or something.
AWG (or gauge size) refers to the cable width: the lower the number, the thicker the cable. The more power you draw, the larger the cable needed so that it doesn’t overheat and melt and/or start a fire (there are other factors like cable length, material etc, but that’s the basic idea). Wall-plugged devices typically require at least 14 AWG, and high-power devices like stoves can go up to 6 AWG cables. Thicker cables are more expensive: that’s why you hear about people stealing copper cables from construction sites.
In our case, the power involved is pretty limited (the valve draws 4W, about half of what an LED light bulb takes), so 18 AWG is plenty. Even my original super-thin 24 AWG cable would have been enough, really. You can use calculators like this one to figure out your needs.
Plumbing
I had next to zero plumbing knowledge before I started, so I spent quite a bit of time at Lowe’s, staring at the wall of pipe fittings and trying to understand what I needed.
Eventually, I realized that the latest big thing in the plumbing world was PEX piping, which is a plastic pipe system that is much easier (and cheaper) to work with than traditional metal pipes. It’s sold in 10ft/3m segments that cost essentially nothing, and then you can buy a number of “push-to-connect” fittings that you literally just push into the pipe to create leak-proof connections, taps, forks, etc. Delightful.
What was significantly less delightful was that the solenoid valve uses traditional brass threads. To connect these to the pipe, you use adapters that you have to screw in. This ended up being a minor nightmare: turns out it’s really, really hard to do this properly and end up with a system that doesn’t leak under pressure, which makes the fact that the push-to-connect system simply works even more remarkable. I had to experiment with a bunch of brands of plumber’s tape, thread sealants, and wrenches before I finally managed to get solid connections.
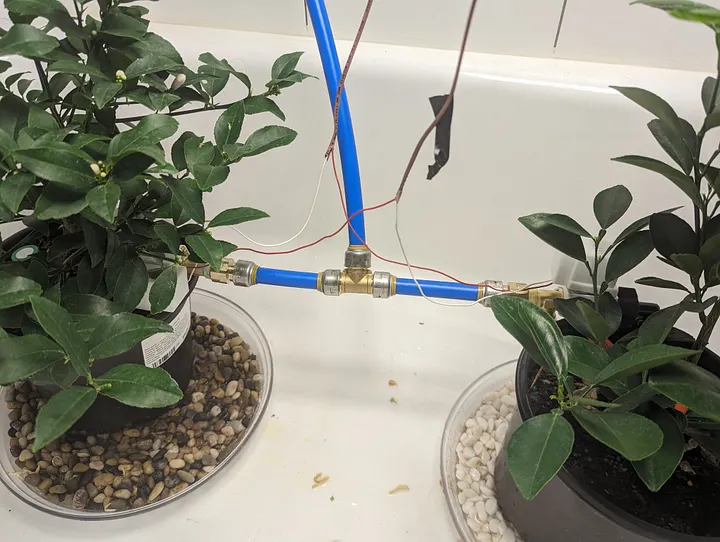
The plumbing is pretty simple besides that: I removed the shower head, and connected a long pipe to a tee that feeds both valves. Then there is a tap after each valve to reduce the flow and orient it a bit, which you can kinda see on this picture but not really:
Code
As I mentioned, this is all Python, which is really the best language for this sort of lightweight project where performance doesn’t really matter. Here is the repo. The code is pretty straightforward, and basically what you imagine.
I have two soil humidity sensors and a leak detector from Ecowitt, which is a brand of cheap weather sensors. I have a whole bunch of their stuff by now: multiple temp/humidity sensors (including one in the bathroom), a wind/rain/sun outdoors station, an AQI/CO2 sensor, three soil sensors, and two leak detectors. This gives me a good amount of info on my home:
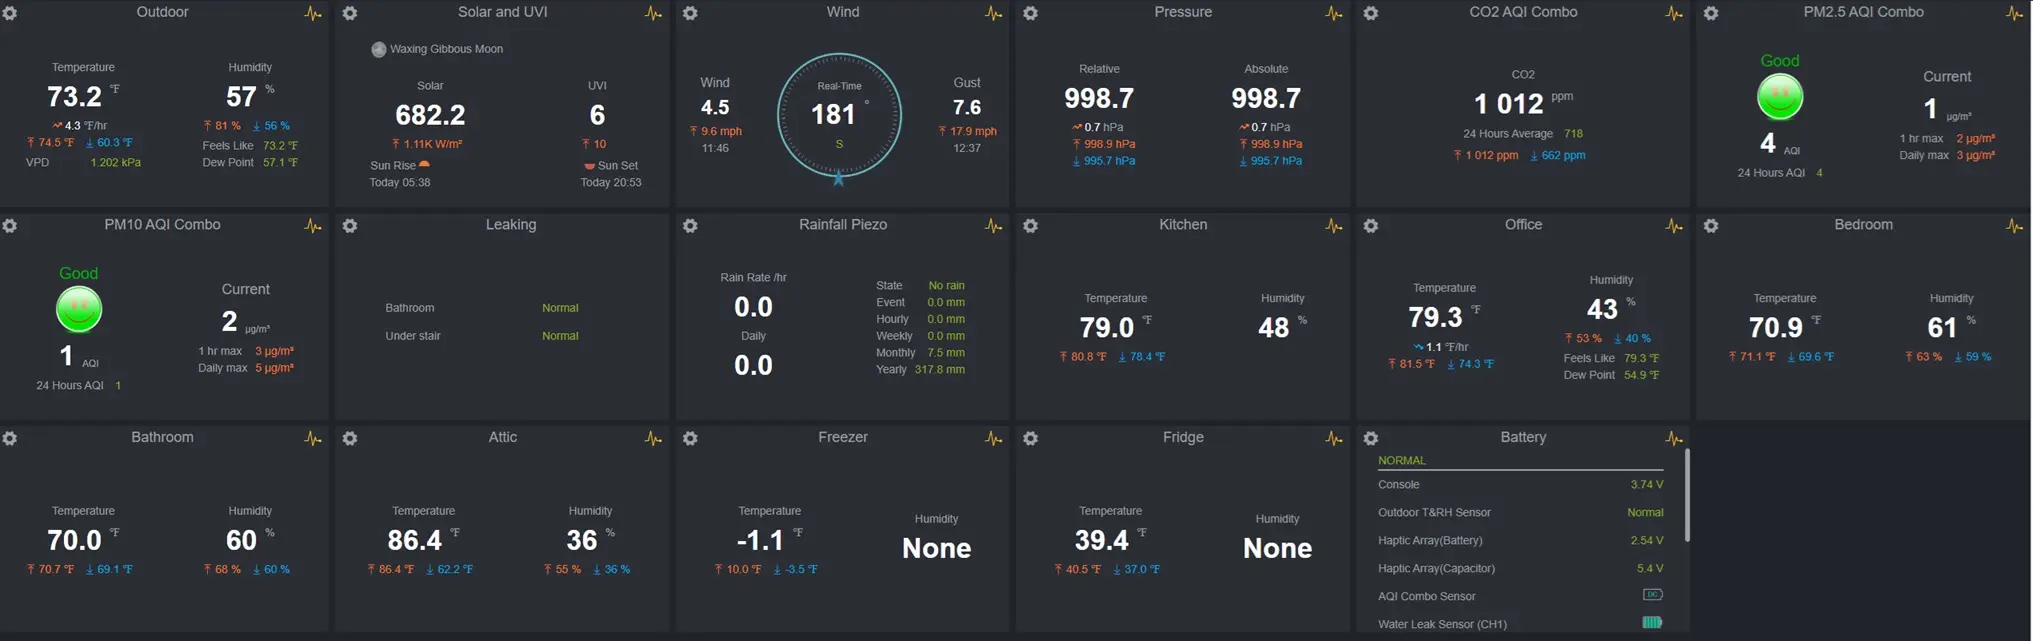
Ecowitt has an API, although you have to call their servers to get data instead of being able to make local calls. There’s almost certainly a way to get the data locally, which would improve reliability, but I haven’t looked into it yet.
Using the wonderful schedule package, I’ve set up two jobs to run repeatedly:
 schedule.every().minute.do(check_for_watering)
 schedule.every(5).seconds.do(check_for_leak)
check_for_leak checks that the water leak sensor isn’t alerting, and shuts everything down if it is:
def check_for_leak():
    try:
        device_info = requests.get(url).json()

        if device_info["data"]["last_update"]["water_leak"][config["EcoWitt"]["LeakSensorId"]]["value"] == "1":
            logging.warning("Leak detected!")
            hue.set_light(int(config["Hue"]["SwitchId"]), 'on', False)
            lemon.relay.off()
            orange.relay.off()
            exit()
    except:
        logging.warning("Couldn't retrieve leak sensor status")
To connect to Philipps Hue (which, again, I’m only using for the smart plug here), I’m using phue, a very simple library to interface with the Hue API (which is local this time at least).
The meat of the code is in the check_for_watering function, which polls the soil humidity sensor, and orders the relay open for a configurable amount of seconds (5, by default) when it goes under a threshold. This is accomplished by using the gpiozero library to make the pin connected to the “in” port of the relay be set to high (RaspberryPi has a 40-pin “General Purpose I/O” thing which you can use for this sort of project).
After that, watering is disabled for a while (10 minutes by default), so that the sensor gets a chance to get a new reading. This hasn’t really been tested (it takes a while for the soil to dry up), so I’ll probably have to calibrate all of these values.
def check_for_watering():
    check_plant(lemon)
    check_plant(orange)

def check_plant(plant: Plant):
    humidity = get_humidity_status(plant)

    if humidity <= plant.watering_threshold:
        logging.info("Humidity of " + plant.name + " at " + humidity  + "%, below threshold (" + plant.watering_threshold + "%)")
        if plant.rest_active:
            logging.info("Rest period active, skipping watering")
            plant.rest_period_counter += 1
            if plant.rest_period_counter >= int(config["Logic"]["RestPeriodMinutes"]):
                logging.info("Rest period over")
                plant.rest_active = False
                plant.rest_period_counter = 0
        else:
            start_watering(plant)
            plant.rest_active = True

def start_watering(plant: Plant):
    logging.info("Starting watering " + plant.name)

    plant.relay.on()
    time.sleep(int(config["Logic"]["WateringDurationSeconds"]))
    plant.relay.off()

    logging.info("Watering done")
That script is running as a systemd service, so it runs when the Raspberry Pi boots up. There is logging and everything.
2024-02-01 18:35:54,299 [INFO] Soil humidity of Lemon: 42%
2024-02-01 18:35:54,815 [INFO] Soil humidity of Orange: 65%
Most everything can be configured with a .ini file (example included in the repo). As always in programming, there is a conflict between genericity and simplicity: I’ve made it reasonably simple enough to extend the system and have more plants or swap the underlying services etc, but it’s still very much specific to my needs. At work I spend hours having to go through three hundred layers of abstraction every time I need to change the color of a button, so I don’t want to have to do that in my spare time, thank you very much.
So did this work or
I originally wrote this article immediately after finishing up the system back in 2024, but I'm now updating it in 2026. So first, let's see how I felt back then:
Things started well! I rapidly started getting some flowers:
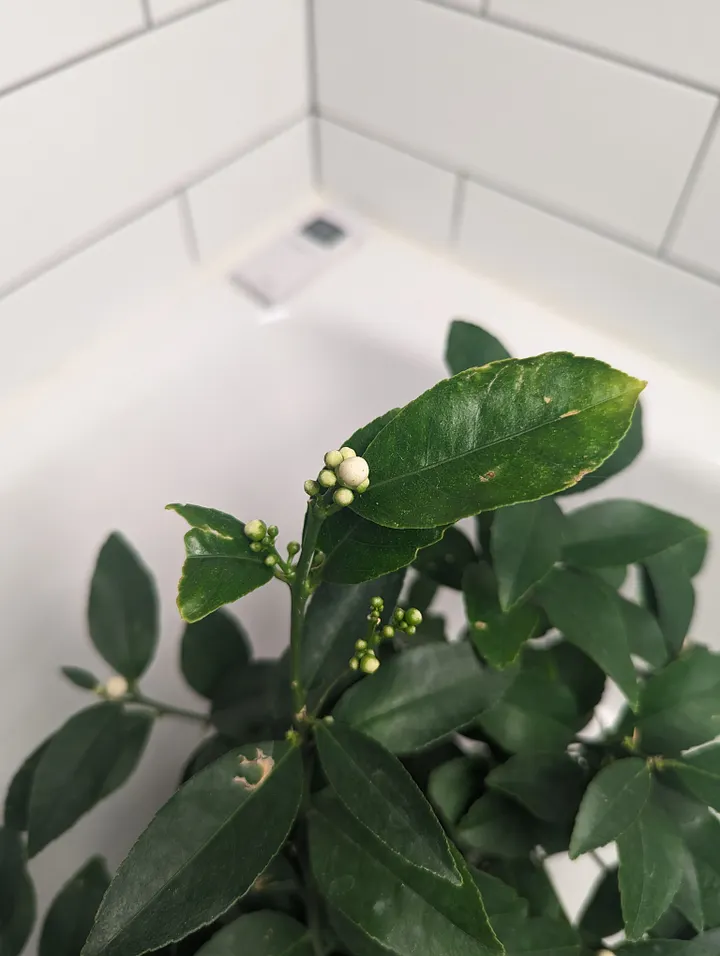
That’s the lemon tree, which fired the first shot when it came to flowering. One of its first flowers is already well on its way to turn into a fruit:
The orange tree only has a single flower so far, but it also has a ton of new leaf growth, which is probably healthy:
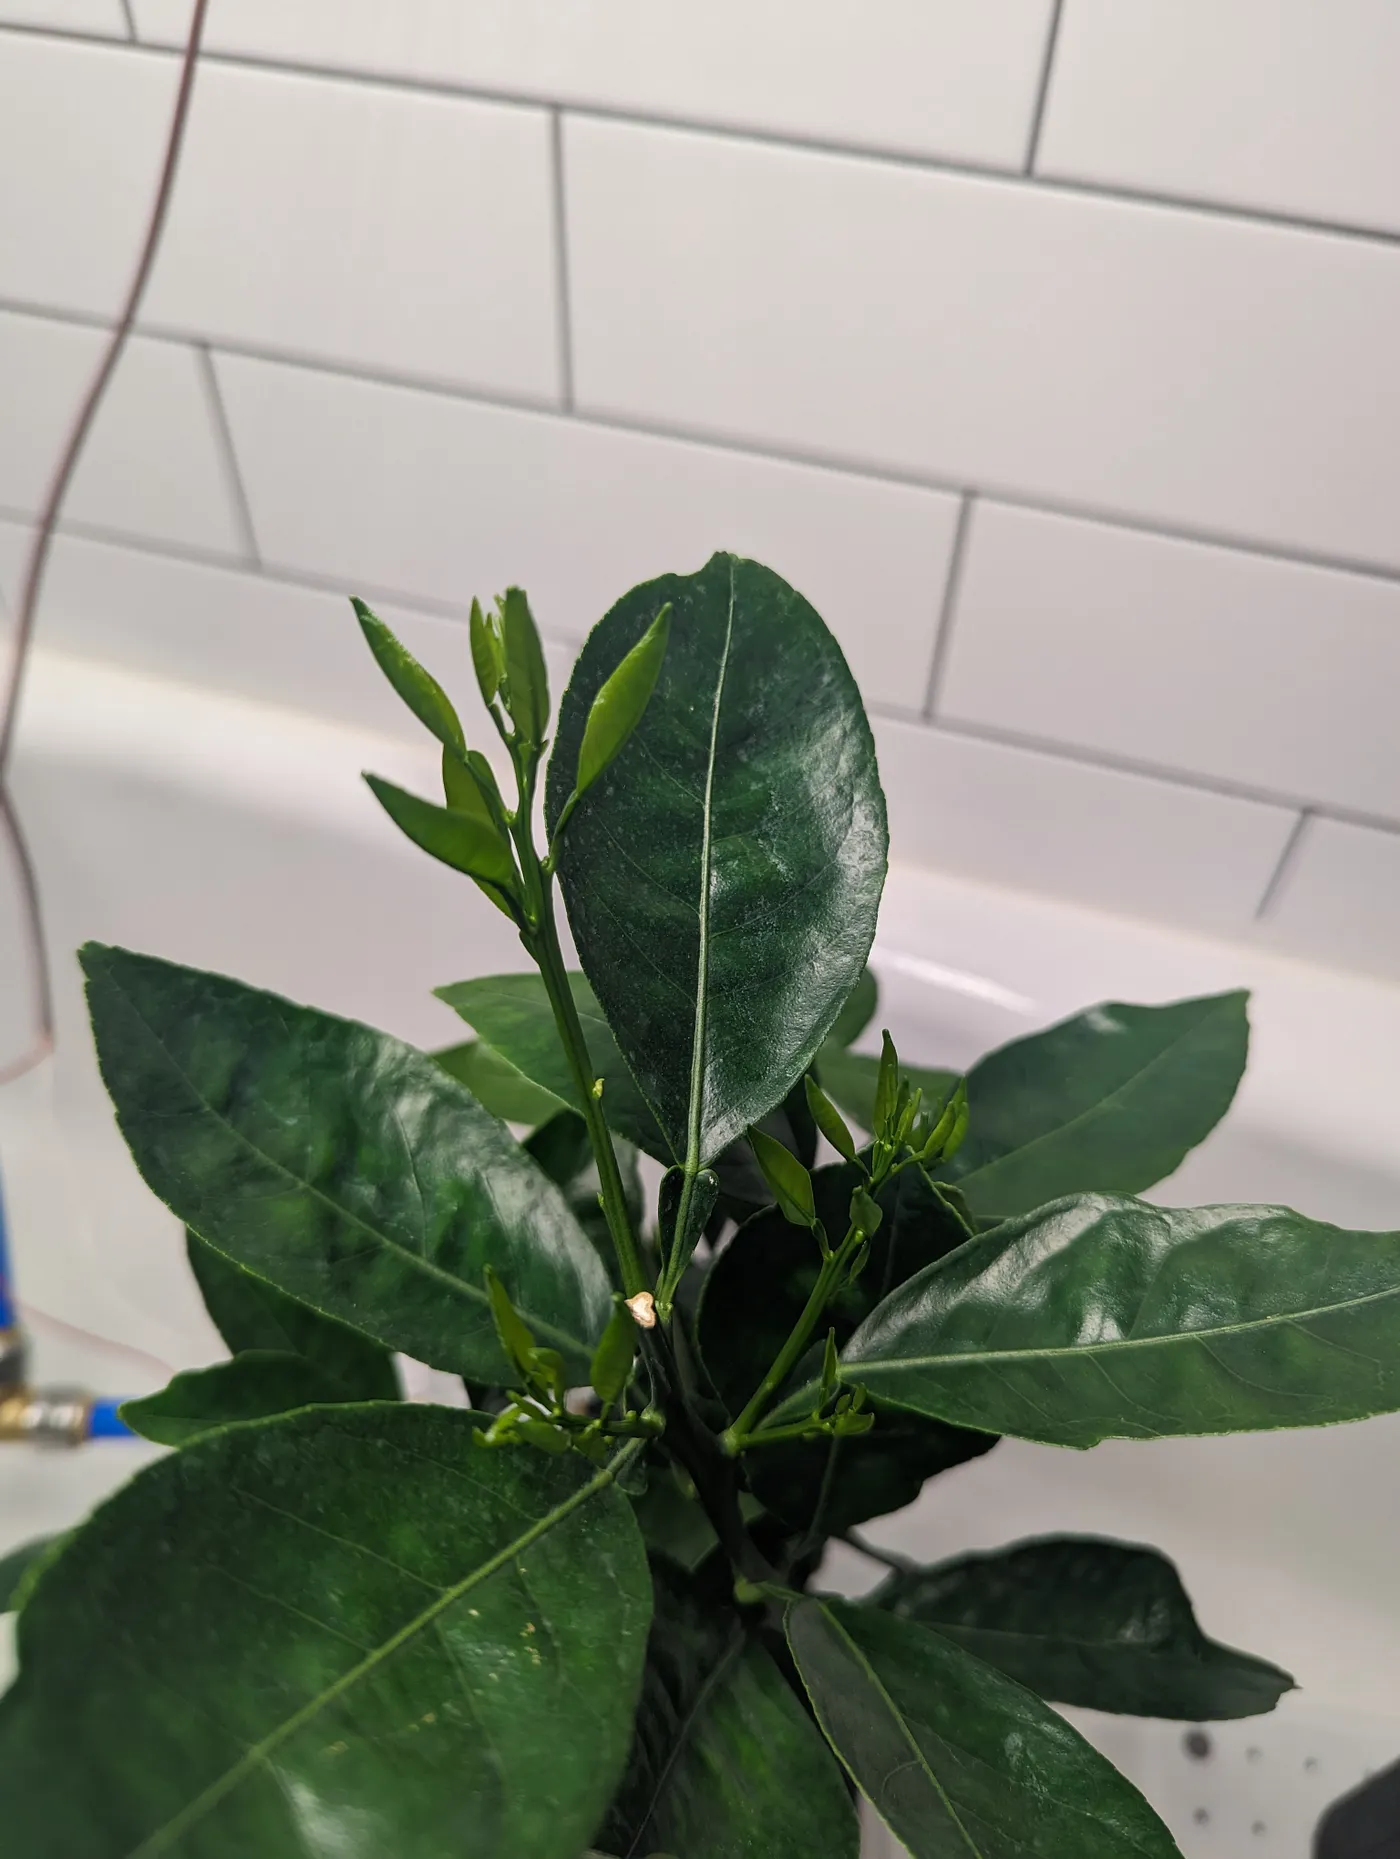
At this point we’re leaving the realm of technology and entering that of gardening. There is probably stuff I’m supposed to do here to improve yields, like pruning leaves and fertilizing and whatnot. I’ll have to research all that: all I know for now is that citrus like light, heat, and humidity, and now that I’ve turned my bathroom into Florida, they have it.
I also set up a camera to take a pic every hour and do a timelapse, using a PiCamera. I also ended up getting a third tree (a lime tree).
No but really, how did it go
Right, so: not as well as I'd have hoped. Past the initial flowering, the trees didn't develop all that much. The orange and lime trees got some good leaf growth in, and the occasional flower, but it would fail to develop into a viable fruit.
I'm not entirely sure what the issue was. I would add fertilizer manually, and it might not have been quite enough. I don't think the root systems were pot-bound, because when the summer came, I moved them outside, and they did end up making flowers and even a couple of fruits. Then I forgot to bring them back in for the winter and they died. I KNEW this would happen!!
What could have been
Among improvements I was considering for the system, it would have been nice to have a more fine-grained control of the heat and humidity. I was relying on the onboard thermostat/humidistat of the heater and humidifier, and it made for a pretty unstable atmosphere:
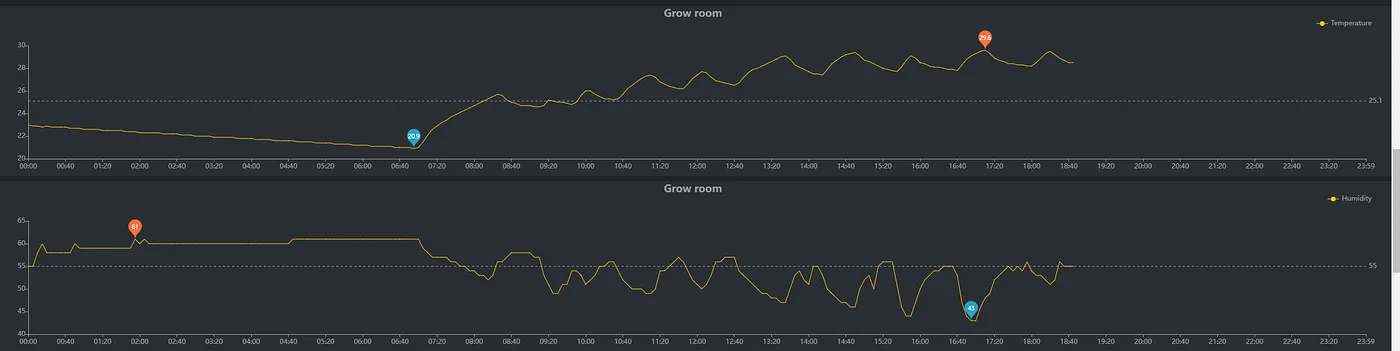
The plants probably didn’t mind too much, but it would be nice to be able to control that stuff directly. Also the humidifier wasn't on the smart plug circuit, so I wasn't able to emergency stop it, which was quite the oversight as it was literally in the bathtub and powered by a 110V cord, thereby making it win the coveted “Most Likely To Start A Fire” award.
Generally speaking though, even though this wasn't going to be passing any inspection, I don’t think it was too dangerous. I expect a humidifier to be pretty well shielded against humidity, and the grow lamp had IP67 waterproofing. The parts that work with water were contained in a bathtub, so flooding was unlikely (and indeed, never happened), especially with my leak detector (which also emits a super loud alarm, so it’s not just used for my jury-rigged emergency stop system). Also, since it’s a bathroom, all the outlets are GFCI-protected, so there’s that.
The sketchiest part was probably the space heater (always a great source of domestic fires) and the mess of power strips and cables. I wasn't worried about overloading them (I had a Kill-A-Watt on the entire system and it peaked at 1000W, well within what they could handle), but they’re meant for indoor use, American sockets are notoriously bad, and the room did get humid. Outdoor-rated plugs and cables would probably have been a good investment.
Speaking of the Kill-A-Watt, this setup consumed a total of 459kWh over the four-ish months I ran it, of which 70% was the heater, another 26% was the lamp, and the rest was the humidifier and Pi. At my electricity rates, that added up to about $55. No prize for calculating how many oranges I could have bought for that money (especially given my incredible yield of zero (0) oranges). For what it’s worth, the power grid in Seattle is 90% renewables, so hopefully it’s not too big of a crime against nature.
Conclusion
So it didn't really work, but it was fun. Don't let that stop you though! Really, the message here is that growing fruit trees in your shower is not only possible, it’s necessary. Everybody should do it. A chicken, for every pot, and a citrus tree in every bathtub, I say!